
The first step in 2D animation is not interpolation or rigging. It is asset preparation: turning one flat character image into separate layers that can move, be corrected, and be exported independently. If a character remains a single raster image, later keyframes, skeletal rigs, and expression swaps become hard to control.
That is why I added a browser-side tool to the site: Animation Asset Lab. It converts a local character or anime image into SVG, layered PNG files, and an asset manifest. Processing happens in the browser only. The file is not uploaded and the server does not store the result.
1. Why segmentation comes first
The goal is to change a flat character picture into an editable structure. Typical layers include hair, face, eyes, clothes, arms, legs, shadows, and highlights. Once those layers exist, an animation system can assign anchors, rotation centers, masks, and keyframes.
Mathematically, the image can be treated as a pixel function:
I(x, y) = [R, G, B, A]Segmentation assigns each pixel to a layer label:
L(x, y) in {0, 1, 2, ..., K - 1}Ideally, one piece of hair or clothing lands in one label, while adjacent but semantically different regions are separated. That label map becomes the base for SVG vectorization, PNG layer export, and animation rigging.
2. The local browser pipeline
The first website version does not call a cloud AI model or load a huge browser model. It uses a lightweight local pipeline:
- Decode the image locally with Canvas.
- Run edge-preserving upscaling to keep cel-style hard edges readable.
- Use RGB color clustering to approximate character segmentation.
- Merge tiny components into spatially adjacent regions with the nearest color.
- Export transparent PNG files for each layer.
- Trace closed contours with a small seam overlap, then write SVG paths.
- Write a
manifest.jsonfile with dimensions, colors, layer area, and segment counts.
This is not a replacement for SAM. It is a fast draft tool that avoids server compute and server storage. It works best with clean character art, transparent backgrounds, hard line art, and cel shading. For complex backgrounds, translucent hair, gradients, or real photos, the offline SAM workflow is more reliable.
3. Production local pipeline: ComfyUI + Grounded-SAM + vtracer
For cleaner production assets, run the heavier pipeline on your own machine rather than uploading private images to the website. The basic script is sam_vtracer_pipeline.py; the complete production coordinator is comfyui_grounded_sam_vtracer_pipeline.py.
The production workflow has three layers:
Multi-view character references
  -> ComfyUI: IP-Adapter locks character identity
  -> ComfyUI: ControlNet OpenPose forces an exploded layout
  -> Grounded-SAM: text prompts cut semantic parts
  -> vtracer: transparent PNG parts become SVG paths
  -> Python: stable IDs are injected into character-rig-layered.svg
3.1 Character identity lock: IP-Adapter
IP-Adapter is not just a loose style reference. It encodes front views, side views, outfit details, and close-ups as image conditions. For animation assets, this solves character consistency: hair color, eye color, ears, scars, accessories, and clothing silhouettes should remain the same across generated sheets.
The downloadable comfyui_exploded_character_workflow.template.json uses placeholders so the script can upload local reference images to local ComfyUI and replace __REFERENCE_IMAGE_1__. Node names differ across ComfyUI custom-node installations, so this is an editable API workflow template rather than a hosted service.
3.2 Pose stripping: OpenPose exploded view
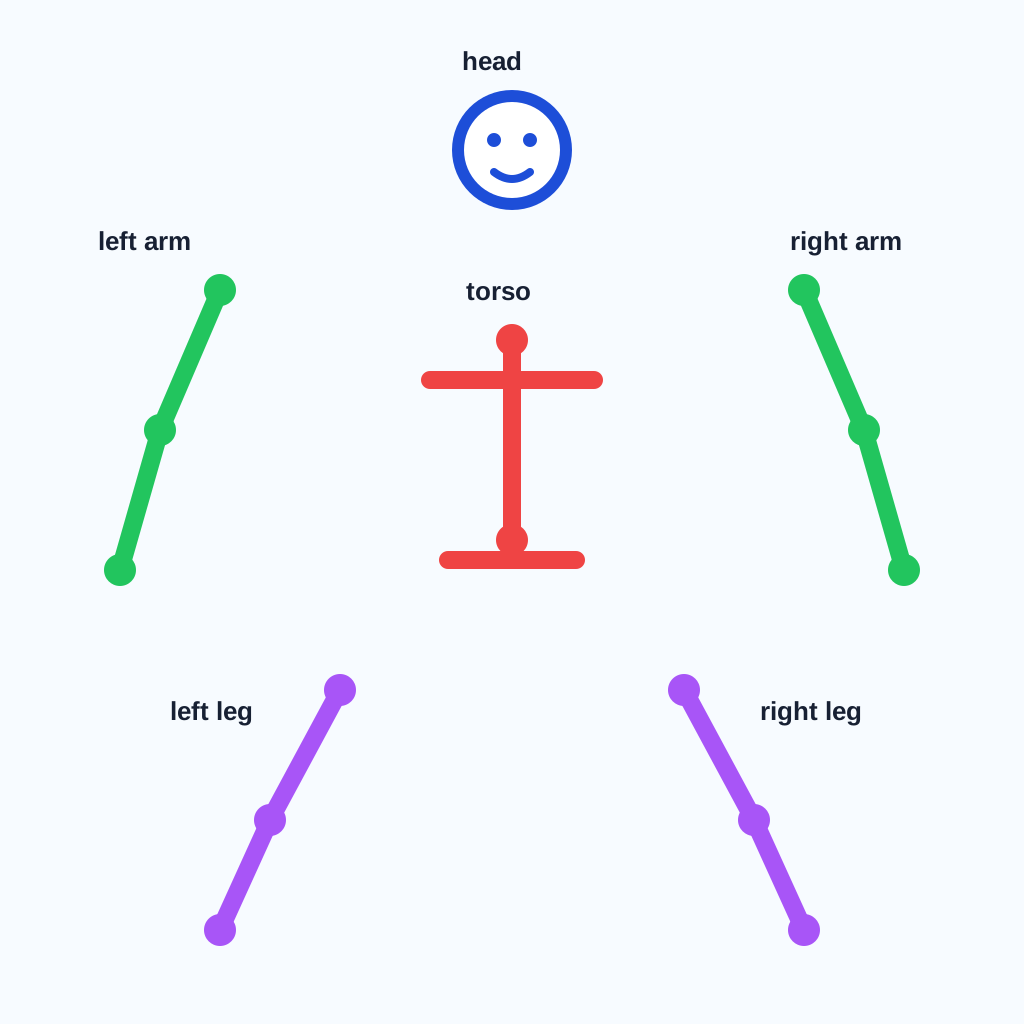
Normal character illustrations often place an arm across the torso, hair over the shoulder, or a weapon in front of the legs. Those images may look good, but they are poor rigging assets. The goal of exploded layout is to keep head, torso, left arm, right arm, legs, tail, and accessories separated.
I added an exploded OpenPose skeleton reference. Export it to PNG if your ControlNet workflow expects a bitmap, then feed it into OpenPose ControlNet. ComfyUI should generate a flat-background character part sheet rather than a single overlapping full-body pose.
3.3 Semantic matting: Grounding DINO + SAM
Coordinate cropping is fragile because each seed changes exact positions and proportions. Grounded-SAM is better for automation: Grounding DINO locates text prompts such as left arm, wolf head, and headband; SAM converts each detected box into a precise alpha mask.
The downloadable part_prompts.example.json provides a default part list. The script writes a transparent PNG for each part and records the prompt, score, and bounding box in the manifest.
3.4 SVG assembly: stable IDs and rig assets
vtracer converts each transparent part PNG into clean SVG paths. Python then combines those paths into one SVG and wraps each part with a stable ID:
<g id="left-arm">...</g>
<g id="right-arm">...</g>
<g id="wolf-head">...</g>
This step matters. Without stable IDs, animation software or a browser runtime cannot reliably find the left arm, right arm, head, and accessories. With stable IDs, the next articles can build anchors, parent-child layers, rigs, and keyframes on top of those parts.
4. Why upscaling belongs before vectorization
Low-resolution anime images often show jagged edges, broken line art, and mixed colors after scaling. A vectorizer sees those artifacts as real boundaries and may create many short paths, which makes the SVG larger and dirtier.
Upscaling or edge-preserving resampling should happen before vectorization. The goal is not to invent detail. The goal is to stabilize contours and make same-color regions more coherent. The browser tool uses a light hard-edge upsample and sharpening step. A heavier local workflow can replace that with an anime-focused upscaler such as a local Real-ESRGAN anime model.
5. How to review the generated asset pack
After generating assets, do not only ask whether the SVG looks attractive. Ask whether it can animate:
- Are hair, face, clothes, and arms separated into usable layers?
- Is the SVG too large or too fragmented?
- Do layer PNG files preserve transparency?
- Do the manifest area and segment counts look reasonable?
- Can you identify anchor points for later rigging?
If the result is too fragmented, raise the detail threshold or reduce the target layer count. If character structures are mixed together, segment with SAM locally first and then vectorize each mask with vtracer. If joints still show white dots, inspect shared geometry, transparent-pixel RGB, and skinning weights instead of only adding a stroke.
“Looks good” is not an acceptance criterion; rigability is
The checklist above is qualitative. In practice, the most effective way to judge whether an asset pack is usable comes down to three quantities you can compute directly — none of which look at whether the art is attractive, only at whether it can move.
First, is the joint actually cut apart? This is the most damaging failure and the easiest to miss. Vectorisation splits along colour boundaries, and at elbows, shoulders and knees the two parts are usually the same colour (one sleeve), so the resulting boundary can land anywhere across the joint — or merge upper arm and forearm into a single piece.
Test it by comparing each part’s bounding box against the expected bone positions: a bone’s two endpoints should fall inside two different parts. If both endpoints of a bone land in the same part, that joint was never separated, and no amount of rigging downstream will make it bend.
Conversely, if two adjacent parts do not overlap at all at the joint, rotation will open a gap. The overlap area should be greater than zero and below roughly 15% of the smaller part’s area — too little and seams show, too much and the split landed in the wrong place, producing a visible double edge under rotation.
Second, has path complexity run away? Vectorisation quality cannot be judged visually alone, because noise-generated path fragments are invisible in a thumbnail while making both runtime performance and later editing painful.
The useful measure is node count divided by contour length per part. Clean cel-style outlines run about one node per 20 to 40 pixels; if that drops to one node per 3 to 5 pixels, the tracer is chasing anti-aliasing noise. Go back upstream and raise smoothing or lower the detail threshold rather than simplifying the SVG — simplification erases genuine contour features along with the noise.
density = node_count / path_length_px
# healthy 0.025 to 0.05    noisy > 0.2
Third, is the layer size distribution sensible? Not the count — the distribution. In healthy layering, a few large parts (torso, hair, clothing) account for most of the total area, with a small tail of minor parts. An even distribution usually means clustering has shredded one semantic part into many pieces. A simple criterion: the three largest layers should cover more than 60% of the non-transparent area; if they do not, reduce the target layer count and rerun.
Why these checks belong before rigging
All three can be computed while the manifest is being generated, at essentially no cost. What deserves emphasis is that they must run before rigging.
The reason is that these defects present misleadingly at the rigging stage. An uncut joint shows up as “the bone rotates but the artwork doesn’t move” — and the first instinct is to check the binding, the pivot, the weights, all of which turn out to be correct, because the problem is further upstream. Fragmented paths show up as an editor that stutters or an export that is inexplicably large, which likewise does not point at vectorisation parameters.
More fundamentally, the rework cost is asymmetric. A bad asset costs a few minutes to regenerate. Discovering it after rigging, weight painting and keyframing means all of that work is thrown away. The further upstream a defect originates, the more it must be caught upstream — true of any multi-stage pipeline, and especially stark here, because the downstream human effort dwarfs the upstream machine time.
As a practical note, these three numbers belong in manifest.json alongside the asset rather than printed once at generation time. Assets get copied, edited and handed to other people; keeping the acceptance data with the asset is what lets the next person judge the state of what they are holding.
6. Where this fits in the 2D animation column
This is the first step in the 2D animation principles column: asset generation. The next steps can cover anchors, parent-child layers, skeletal rigs, keyframes, easing curves, interpolation, masks, and camera movement. Those topics need clean assets first.
Use the tool here: Animation Asset Lab. It is best for quickly checking whether a character image can be separated into layers. For finished work, combine the offline script, manual cleanup, and animation software, then continue with the 2D Animation Principles series for bones, IK, skinning, and keyframes.